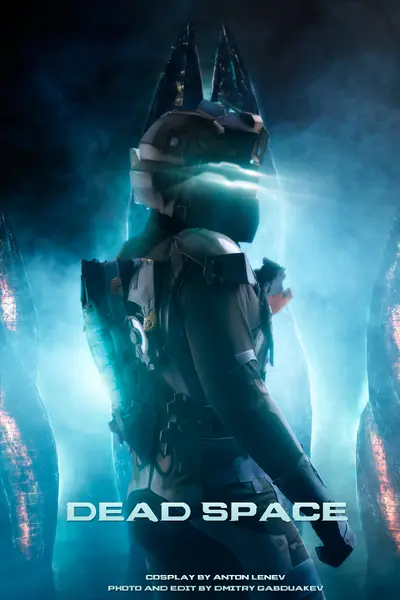
Dead Space 2 — Advanced Suit
The Advanced Suit costume of Isaac Clarke from Dead Space 2 is one of the most technically complex projects: EVA armor, leather, neural-network-upscaled game texture, biflex printing, Arduino electronics with IR and wireless control. The Advanced Suit was chosen deliberately — stylistically it leans into 90s–2000s sci-fi, in contrast to the baseline engineering suit rooted in 70s–80s sci-fi.
The bodysuit is sewn from biflex with the character’s own texture printed on it: the 1024×1024 in-game texture was upscaled by a neural network to 12000 px. The pattern is simplified (two halves + sleeves, inspired by a free Spider-Man suit template), prototyped on cheap fabric and digitized through Photoshop + a vector editor. Printed on 4 m² of biflex — the printer’s minimum order.
The armor combines EVA foam (base + decorative overlays), natural vegetable-tanned leather (arm pieces and movable parts with real hinges), and transparent PET plastic for the glowing elements (the central glowing block was heat-formed over a cardboard tube).
The RIG electronics (back module) is built on an Arduino Uno: a WS2801 addressable RGB strip drives the health + stasis indicators, two SG90 servos move the shoulder flaps, an IR sensor receives commands from a standard IR remote, and an NRF24L01 wireless module syncs helmet lighting with the flaps (bidirectional link, up to 8 nodes). The helmet and the plasma cutter share the same architecture on an Arduino Nano (for compactness). The full Arduino code is on the author’s GitHub.
The helmet combines a Pepakura model found online with manually built details shaped from masking tape and transferred onto EVA. The visor opens on two side hinges instead of top-mounted ones — otherwise the helmet would become too tall when open.
The plasma cutter was designed in Fusion 360, flat parts were laser-cut from plywood, curved walls were built up from EVA Shore 70; inside sits an Arduino Nano + rotation servo + WS2801 LED + NRF.
Paint: on EVA — Plastidip / “liquid rubber” base → acrylic base coat → airbrush detail (acrylic thinned with vodka for better atomization) → matte acrylic spray lacquer. On leather — artist acrylic (not fabric acrylic — that stays sticky) finished with a wax coating.
Full step-by-step process with photos of every stage — in the archived author’s article (Russian). The costume is also covered on Habr, DTF and Instructables.
P.S. Huge thanks to my father for helping with sewing the suit.